Architectures
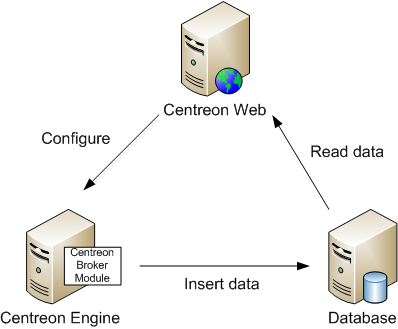
Single Poller
If your monitoring needs are small and a single poller will be enough for the job, you only have to configure a single Centreon Broker instance, namely the module loaded within your monitoring engine.
Centreon Broker Configuration
In this setup, Centreon Broker only needs to be configured on the single central poller.
In Centreon Web, go to Configuration -> Centreon -> Centreon Broker -> Configuration. Click the add button and enter the following informations:
Name |
Central-Module |
Config file name |
central-module.xml |
Status |
Enabled |
Requester |
Central |
Add a logger object to your convenience and add an output object with the following characteristics:
Type |
SQL - Broker SQL Database |
Name |
Database-Master |
DB Type |
MySQL |
Failover name |
|
DB host |
<your DB host> |
DB port |
3306 |
DB user |
<your DB user> |
DB password |
<your DB password> |
DB name |
centreon_storage |
Engine Configuration
In Centreon Web, go to Configuration -> Nagios -> main.cfg and enter
the main configuration file. In the Data tab, change the
Multiple Broker Module line to
/path/to/your/cbmod.so
/path/to/your/central-module.xml
.
The path to Centreon Broker’s module (cbmod.so) was defined when you install centreon broker. The path to the configuration file is defined in Configuration -> Centreon -> Central -> Centreon Broker configuration path.
Note
you do not need the “config_file=” part on the broker module line anymore.
Application
Save the file and export configuration files and restart your poller through Centreon Web interface (Configuration -> Nagios menu).
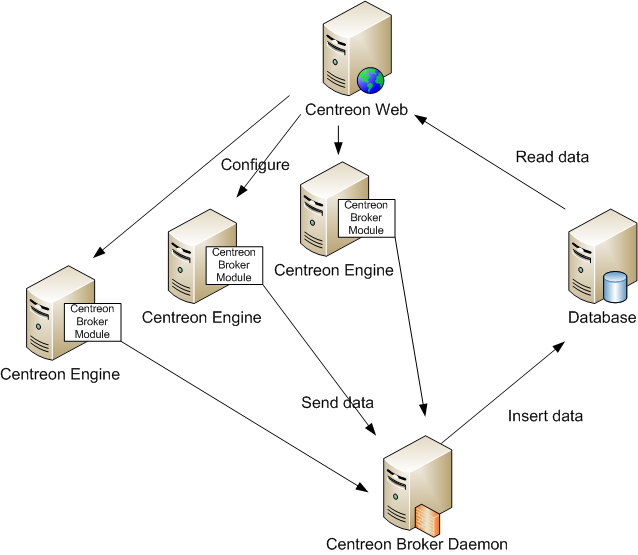
Multiple pollers
If you plan on monitoring more than thousands of services, you’ll probably need multiple pollers. In such cases, the architecture is different from the single poller architecture. In these cases, instead of sending data directly in the database, we will bounce on a Centreon Broker daemon that will insert data in the DB itself. We will use the port 5668 for this purpose.
Centreon Broker Configuration
On Pollers
In Centreon Web, go to Configuration Centreon -> Centreon Broker -> Configuration. For each poller, click the add button and enter the following information:
Name |
<your poller name>-Module |
Config file name |
<your poller name>-module.xml |
Status |
Enabled |
Requester |
<your target poller> |
Add a logger object to your convenience and add an output object with the following characteristics (leave default when unspecified):
Type |
TCP - IPv4 |
Name |
Broker-Master |
Host to connect to |
<address of the central Broker machine> |
Connection port |
5668 |
Serialization protocol |
BBDO Protocol |
On Central
In Centreon Web, go to Configuration Centreon -> Centreon Broker -> Configuration. Click the add button and enter the following information:
Name |
Central-Broker |
Config file name |
central-broker.xml |
Status |
Enabled |
Requeste |
Central |
Note
if using startup scripts (SysV or Upstart), you should check that the config file name you entered above match the script. Otherwise, strange behavior might occur.
Add a logger object to your convenience.
Add an input object with the following characteristics (leave default when unspecified):
Type |
TCP - IPv4 |
Name |
Broker-Master |
Host to connect to |
|
Connection port |
5668 |
Serialization protocol |
BBDO Protocol |
Add an output object with the following characteristics:
Type |
SQL - Broker SQL Database |
Name |
Database-Master |
DB Type |
MySQL |
Failover name |
|
DB host |
<your DB host> |
DB port |
3306 |
DB user |
<your DB user> |
DB password |
<your DB password> |
DB name |
centreon_storage |
Engine Configuration
In Centreon Web, go to Configuration -> Nagios -> nagios.cfg and
enter the main configuration file. In the Data tab, change the
Multiple Broker Module line to /path/to/your/cbmod.so
/path/to/your/central-module.xml.
The path to Centreon Broker’s module (cbmod.so) was defined when you installed Centreon Broker. The path to the configuration file is defined in Configuration -> Centreon -> Central -> Centreon Broker configuration path.
Application
Save the file, export configuration files and restart your poller through Centreon Web interface (Configuration -> Monitoring Engine menu).