Configuration of the poller
Once the installation is completed, it is necessary to integrate this remote poller into the Centreon configuration.
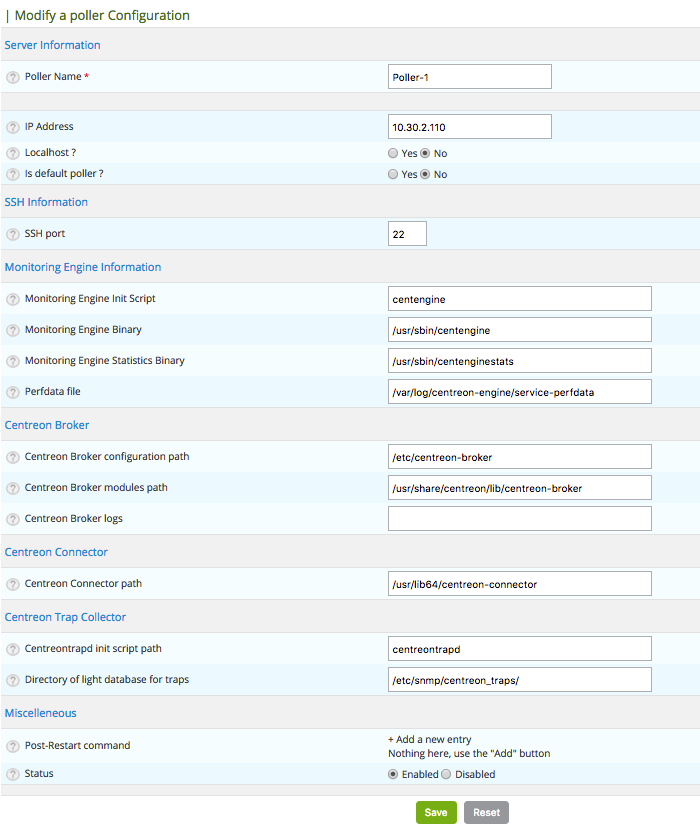
Go into the menu: Configuration > Pollers
Duplicate the central server and edit it
Change the following settings, and save:
Change the name of the Poller Name.
Enter the IP address of the poller in the IP Address field.
Enable the poller by clicking on Enabled in the Status field.
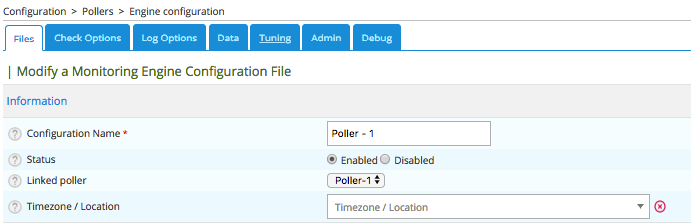
Go into the Configuration > Pollers > Engine configuration menu
Select your last added configuration.
Change the following settings, and save:
In the Files tab:
Modify Configuration Name
Check that Linked poller is the previously created poller
Change if necessary the Timezone / Location
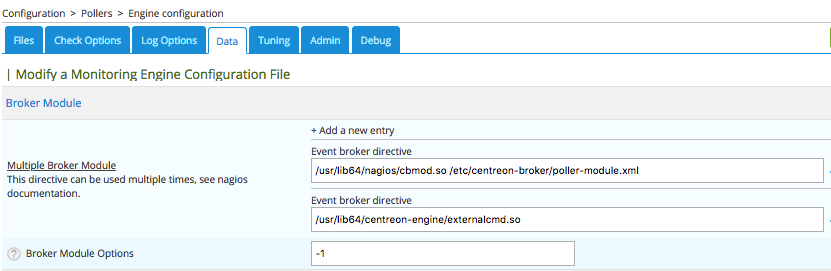
In the Data tab - Multiple Broker Module fields check / add the following entries:
/usr/lib64/centreon-engine/externalcmd.so

/usr/lib64/nagios/cbmod.so /etc/centreon-broker/poller-module.xml
Centreon Broker configuration
It is necessary to generate a configuration file for Centreon Broker:
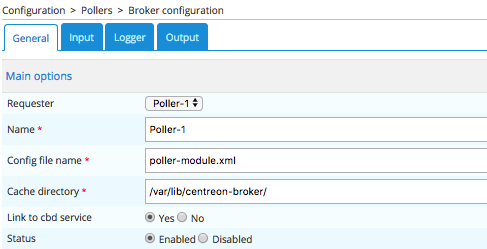
Go into the menu: Configuration > Pollers > Broker configuration
click on Add
In the General tab:
Select the Requester
Set Name of the configuration
Set Config file name ** that should be exactly the same as the one defined in Centreon Engine configuration, for example **poller-module.xml
Check the value No for the Link to cbd service option
In the Output tab:
Add a new TCP - IPv4 output
Set the Name
Set the distant TCP port, by default 5669
Set the IP address of the Centreon central server (Host to connect to)
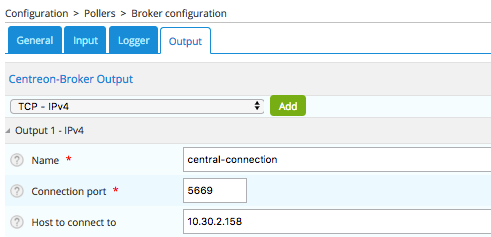
Save the configuration
Centreontrapd Configuration
It is necessary to change the configuration files of Centreontrapd so that the service can question the SQLite database (see the chapter: SNMP traps).
Plugins synchronization
You can synchronize the plugins between your central server and your remote pollers using rsync software.
Warning
Don’t perform this action if your plugins depend on third party libraries that need to have been installed previously.
Exchanging SSH keys
For the central server to be able to export the configuration files of the monitoring engine, it is necessary to make a SSH key exchange between the central server and the new remote poller.
On the remote poller:
Log in as a ‘root’
Change the Centreon user password:
# passwd centreon
On the central server:
Log in as ‘Centreon’:
# su - centreonIf you have not already generated a public / private key pair, enter the following command (leave the default options):
$ ssh-keygen
Then export your SSH key to the remote poller:
$ ssh-copy-id -i /var/spool/centreon/.ssh/id_rsa.pub centreon@[POLLER_IP]
Check that you can log in from the central server to the remote poller as a Centreon user. You can you use the command:
$ ssh centreon@[POLLER_IP]
Export the configuration
The final step is to export the configuration to verify that the installation of the remote poller has been executed correctly.
Note
Refer to the documentation: Export configuration