How to install an activation key
Presentation
Payed products developed by Centreon requires an activation key (license). This activation system is based on a development runtime application named « Zend ».
To complete the software suite installation developed by Centreon and the activation key, it is necessary to install the « Zend » runtime application.
This document present all the informations to :
- Installing the « Zend » runtime application ;
- Obtaining the activation key ;
- Installing the activation key.
Prerequisites
The procedure described in this document can be performed on any Linux system. But, some element may vary depending on the system used. This chapter describe the differences that may be encountered.
Web Server
The Web server name can differ depending on the Web server used. The bellow table lists the naming depending on the Operating System used :
| Operating System | Web service | Initialization script |
|---|---|---|
| Debian | apache2 | /etc/init.d/apache2 |
| Ubuntu | ||
| Red hat | httpd | /etc/init.d/httpd |
| Cent OS |
Same for the user and group associated to the Web server, they can differ depending on the system used :
| Operating System | User name | Group name |
|---|---|---|
| Debian | www-data | www-data |
| Ubuntu | ||
| Red hat | apache | apache |
| Cent OS | ||
| Suse | wwwrun | wwwrun |
Installing the Zend runtime application
The « Zend » runtime application must be installed in a different version depending on the PHP version used with the web server. The following table lists the differences and which « Zend » version to use :
| Runtime application | PHP Version |
|---|---|
| Zend Optimizer | PHP <= 5.2 |
| Zend Guard Loader | PHP = 5.3 |
Note
Installing those softwares modify the PHP configuration (php.ini). This modification does not impact the other softwares using the same Web server.
Warning
The modules developed by CENTREON are not compliant with PHP 5.3.2. To workaround this problem, proceed in upgrading the PHP version used. As a side note, this version is used with the Linux distribution « Ubuntu 10.04 ».
Installing on the distribution Centreon Enterprise Server
The Zend runtime application is already installed on the professional « Centreon Enterprise Server ».
No extra manipulation is needed, go directly to the chapter : «obtaining the server serial number».
Installing on an other distribution
As explained in the introduction, the runtime application installation procedure is not the same depending on the PHP version used. As as per-requisite, it is necessary to know which PHP version is used.
To obtain this information, type the following command :
# php -v
Installing with PHP 5.2 or lower
If the PHP version is 5.2 or lower, « Zend Optimizer » must be installed. The necessary resources are available at the following links (depending on your architestures) :
Installation
To perform this installation, move the archive on the main monitoring server, then uncompress it :
# tar -xzf ZendOptimiser-3.3.9.tag.gz
# cd ZendOptimiser-3.3.9
Create the installation folder, then move the library «ZendOptimizer .so » in it :
# mkdir /usr/local/Zend
# mkdir /usr/local/Zend/lib
The file used must correspond to the PHP version used on the server.
For example, if the PHP correspond to a version 5.2, it is necessary to use the library in the folder « /data/5_2_x_comp/ ».
# cp data/5_2_x_comp/ZendOptimizer.so /usr/local/Zend/lib/
Configuration
Add the following line at the end of the PHP configuration file (php.ini).
# locate php.ini
/etc/php5/apache2/php.ini
# vi /etc/php5/apache2/php.ini
[Zend]
zend_extension=/usr/local/Zend/lib/ZendOptimizer.so
This file is usually find in the folder « /etc », but it also can be found in an other folder depending on the operating system used (e.g. /etc/php5/apache2/php.ini)
Note
Depending on the operation system used, the PHP may use two distinct configuration files : 1. The first is used to configure PHP when used by the Web Server ; 2. The second is used to configure PHP when used by the command line (php-cli). If your system is using such a configuration, it is necessary to modify both PHP configurations.
To finalize your installation, restart the web server using the command line adapted to your environment :
# /etc/init.d/httpd restart
Installing with a PHP 5.3
If the PHP version is 5.3, « Zend Guard Loader » must be installed. The necessary resources are available at the following link (depending on your architestures) :
Installation
To perform this installation, move the archive on the main monitoring server, then uncompress it :
# tar xzf ZendGuardLoader-php-5.3-linux-glibc23-x86_64.tar.gz
# cd ZendGuardLoader-php-5.3-linux-glibc23-x86_64/php-5.3.x
Create the installation folder, then move the library « ZendGuardLoader.so » in it :
# mkdir /usr/local/Zend
# mkdir /usr/local/Zend/lib
# cp ZendGuardLoader.so /usr/local/Zend/lib/
Configuration
Add the following line at the end of the PHP configuration file (php.ini).
# locate php.ini
/etc/php5/apache2/php.ini
# vi /etc/php5/apache2/php.ini
[Zend]
zend_loader_enable=1
zend_extension=/usr/local/Zend/lib/ZendGuardLoader.so
This file is usually find in the folder « /etc », but it also can be found in an other folder depending on the operating system used (e.g. /etc/php5/apache2/php.ini)
Note
Depending on the operation system used, the PHP may use two distinct configuration files : 1. The first is used to configure PHP when used by the Web Server ; 2. The second is used to configure PHP when used by the command line (php-cli). If your system is using such a configuration, it is necessary to modify both PHP configurations.
To finalize your installation, restart the web server using the command line adapted to your environment :
# /etc/init.d/httpd restart
Obtaining the server serial number
To obtain the activation key, it is necessary identifying the serial number to be associated with the product.
This serial number will have to be given to the Merethis Service Desk to obtain the product’s activation key.
On a dfistribution Centreon Enterprise Server
Go to the menu :
« Administration » → « Modules »
The module you installed must be displayed on the module list. Then click on the following button 
A pop-up will be displayed and will show the serial number :
Note
If the server hardware has several NIC, the command will list as many serial number as card. All serial number must ne given to proceed to the product activation
On other distributions
To obtain the serial number, it is necessary to use a binary given by Centreon (depending on your architecture) :
Copy the archive on your monitoring server, then uncompress it and place the binary on its dedicated folder :
# mkdir /usr/local/Zend/bin
# tar xzf zendid-linux-i386.tar.gz
# mv zendid /usr/local/Zend/bin
# cd /usr/local/Zend/bin/
To obtain the serial number, execute the following commands :
# chmod 755 /usr/local/Zend/bin/zendid
# ./zendid
M:65VHT-WWXQ3-FKM36-7548F
Note
If the server hardware has several NIC, the command will list as many serial number as card. All serial number must ne given to proceed to the product activation.
Installing a Centreon module
Each module is delivered with its own installation and exploitation procedure.
At this stage of the installation, go to the product documentation to find its specific installation procedure.
Once the module is installed, go to proceed with the activation key file installation.
Installing the activation key file
Professionals solutions developed by CENTREON needs an activation key to be used. You will find in the next chapters the different steps to performed to be able to install this activation key given by CENTREON.
Checking the configuration
As a start, you must check that the zend runtime application take into account the new installed activation key.
If your are using a « Centreon Enterprise Server », configuration file « ZendOptimizer_LicencePath.ini » must contain the bellow configuration line (where <module> correspond to the installed module) :
# cat /etc/php.d/ZendOptimizer_LicencePath.ini
zend_optimizer.license_path=/usr/share/centreon/www/modules/<module>/license
If you are using a system based on Debian or Suse :
# cat /etc/php.ini
zend_optimizer.license_path=/usr/local/centreon/www/modules/<module>/license
The displayed line indicates the folder where the activation key file is to be installed (every product has its own activation key path)
If the activation key path is not set, edit the file to add it.
Note
If several activation keys are installed, the different module path must be separated by the character « : » :
# cat /etc/php.d/ZendOptimizer_LicencePath.ini
/usr/share/centreon/www/modules/centreon-bam-server/license:/usr/share/centreon/www/modules/centreon-biserver/license:/usr/share/centreon/www/modules/centreon-bam-server/license
It may be possible that you have to restart the Apache web server.
/etc/init.d/httpd restart (On CentOS system)
Installing an activation key
Go to the menu :
« Administration » → « Modules »
The module you installed must be displayed on the module list. Then click on the following button
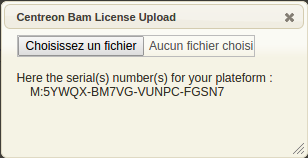
A pop-up will be displayed and will offer to choose a file:
Click on « Choose file » and select the activation key file corresponding to the software.
If the uploaded activation key file is valid, the following message will be displayed :

Your product is now operational.